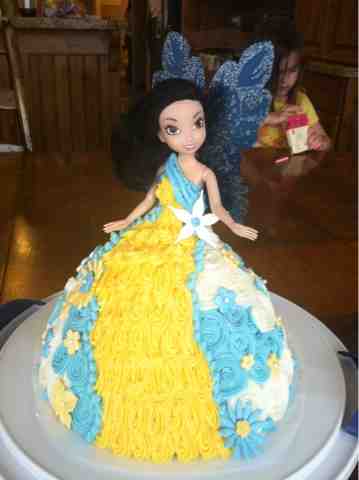
Disney Fairy Silvermist Cake
From Disney's Tinkerbell movies, Silvermist
Saying that my girls love the Tinkerbell movies is probably an understatement. They love all the characters but my oldest daughter decided she wanted a Silvermist dress cake for her fifth birthday. I honestly didn't know how this was going to turn out until it was done. I should have had a plan and drawn out what I wanted her dress to look like but I didn't! I was seriously nervous for this cake.

I made the gum paste flowers ahead of time to make sure they were dry. I didn't know how many I would need or what style I wanted.. So I made a whole bunch of all the kinds I liked in different colors and sizes so I had plenty to choose from. All I knew is it was going to be blue and yellow.. This is the picture I was kind of going by.

I had also planned on making the dress cake by cutting round cakes like this tutorial, it's long but really helpful.
http://m.youtube.com/#/watch?v=IUI7Sn0X_7k&desktop_uri=%2Fwatch%3Fv%3DIUI7Sn0X_7k
At the last minute my husband told me he didn't want me stressed if I didn't get the cake to work so I bought the Wilton Wonder Cake Set which is basically a Barbie Dress Cake Mold. It worked pretty well except it baked about 20 mins more than my recipe calls for so when I opened the oven thinking it should be cooked the cake fell in the center. Oops.. After it was cooked through I cut the bottom off and it was fine.
As you can see this cake did not go as planned... Or not planned...since I just didn't plan at all...
So here's the basics of how I iced it.
There's a little hole in the center so I just put the doll down in there. I put her hair up and wings off (not in the picture) so they didn't get frosting on them. The cake should go about to her hips. Don't worry you will build up the top of the dress with frosting.


Then you're ready for piping. Color the frosting and have all your tips ready. I used a star tip and a circle tip. For the back I used a circular motion with the star tip and varying blue and white to make rose like circles. In the front I left a slanted space for the yellow.


To finish use the circle tip and blue to make dots where the blue and yellow meet. Add gum paste flowers where you like them, put her wings on and hair down and you're done!


It was a hit! My second daughter wants a Rosetta cake like this for her fourth birthday.. So you can expect more dress cakes to come!


Comments
Post a Comment